Mirror Mirror on the Wall
With a young family, there is a lot of stuff going on at home. School, Kinder, work, various appointments, social outings. My wife and I run a shared calendar on Google, which is handy to have on our phones, but difficult to share with others, especially the kids. She really liked the look of the SkyCalendar, but it’s a bit expensive for a single use device (ie, a Calendar), and it also includes a monthly subscription fee for the majority of the features. So, what could I cobble together for a bit less?
The Hardware
I started off looking for some kind of large Android tablet as a dashboard display. Unfortunately in that 11inch+ size, the prices really start to escalate. What you can get, which are reasonably priced, are these small, generic, high resolution portable monitors from Alibaba or Amazon. It’s a 15.6 inch 1080P FHD Touch Monitor, with either USB-C or HDMI input. The screen itself is surprisingly bright on the highest setting, and definitely sharp enough for our needs. I’ve had an old Raspberry Pi 3 in the cupboard, which I decided would be perfect to drive it, but it only has HDMI out. You are supposed to be able to get the touch functionality working with a separate USB-A cable (which came in the box), but I couldn’t get it working with Raspbian. So, no touch for the first iteration.
I swung by Ikea, and picked up one of these Roedalm Birch frames to mount the screen in, which was roughly the right size.
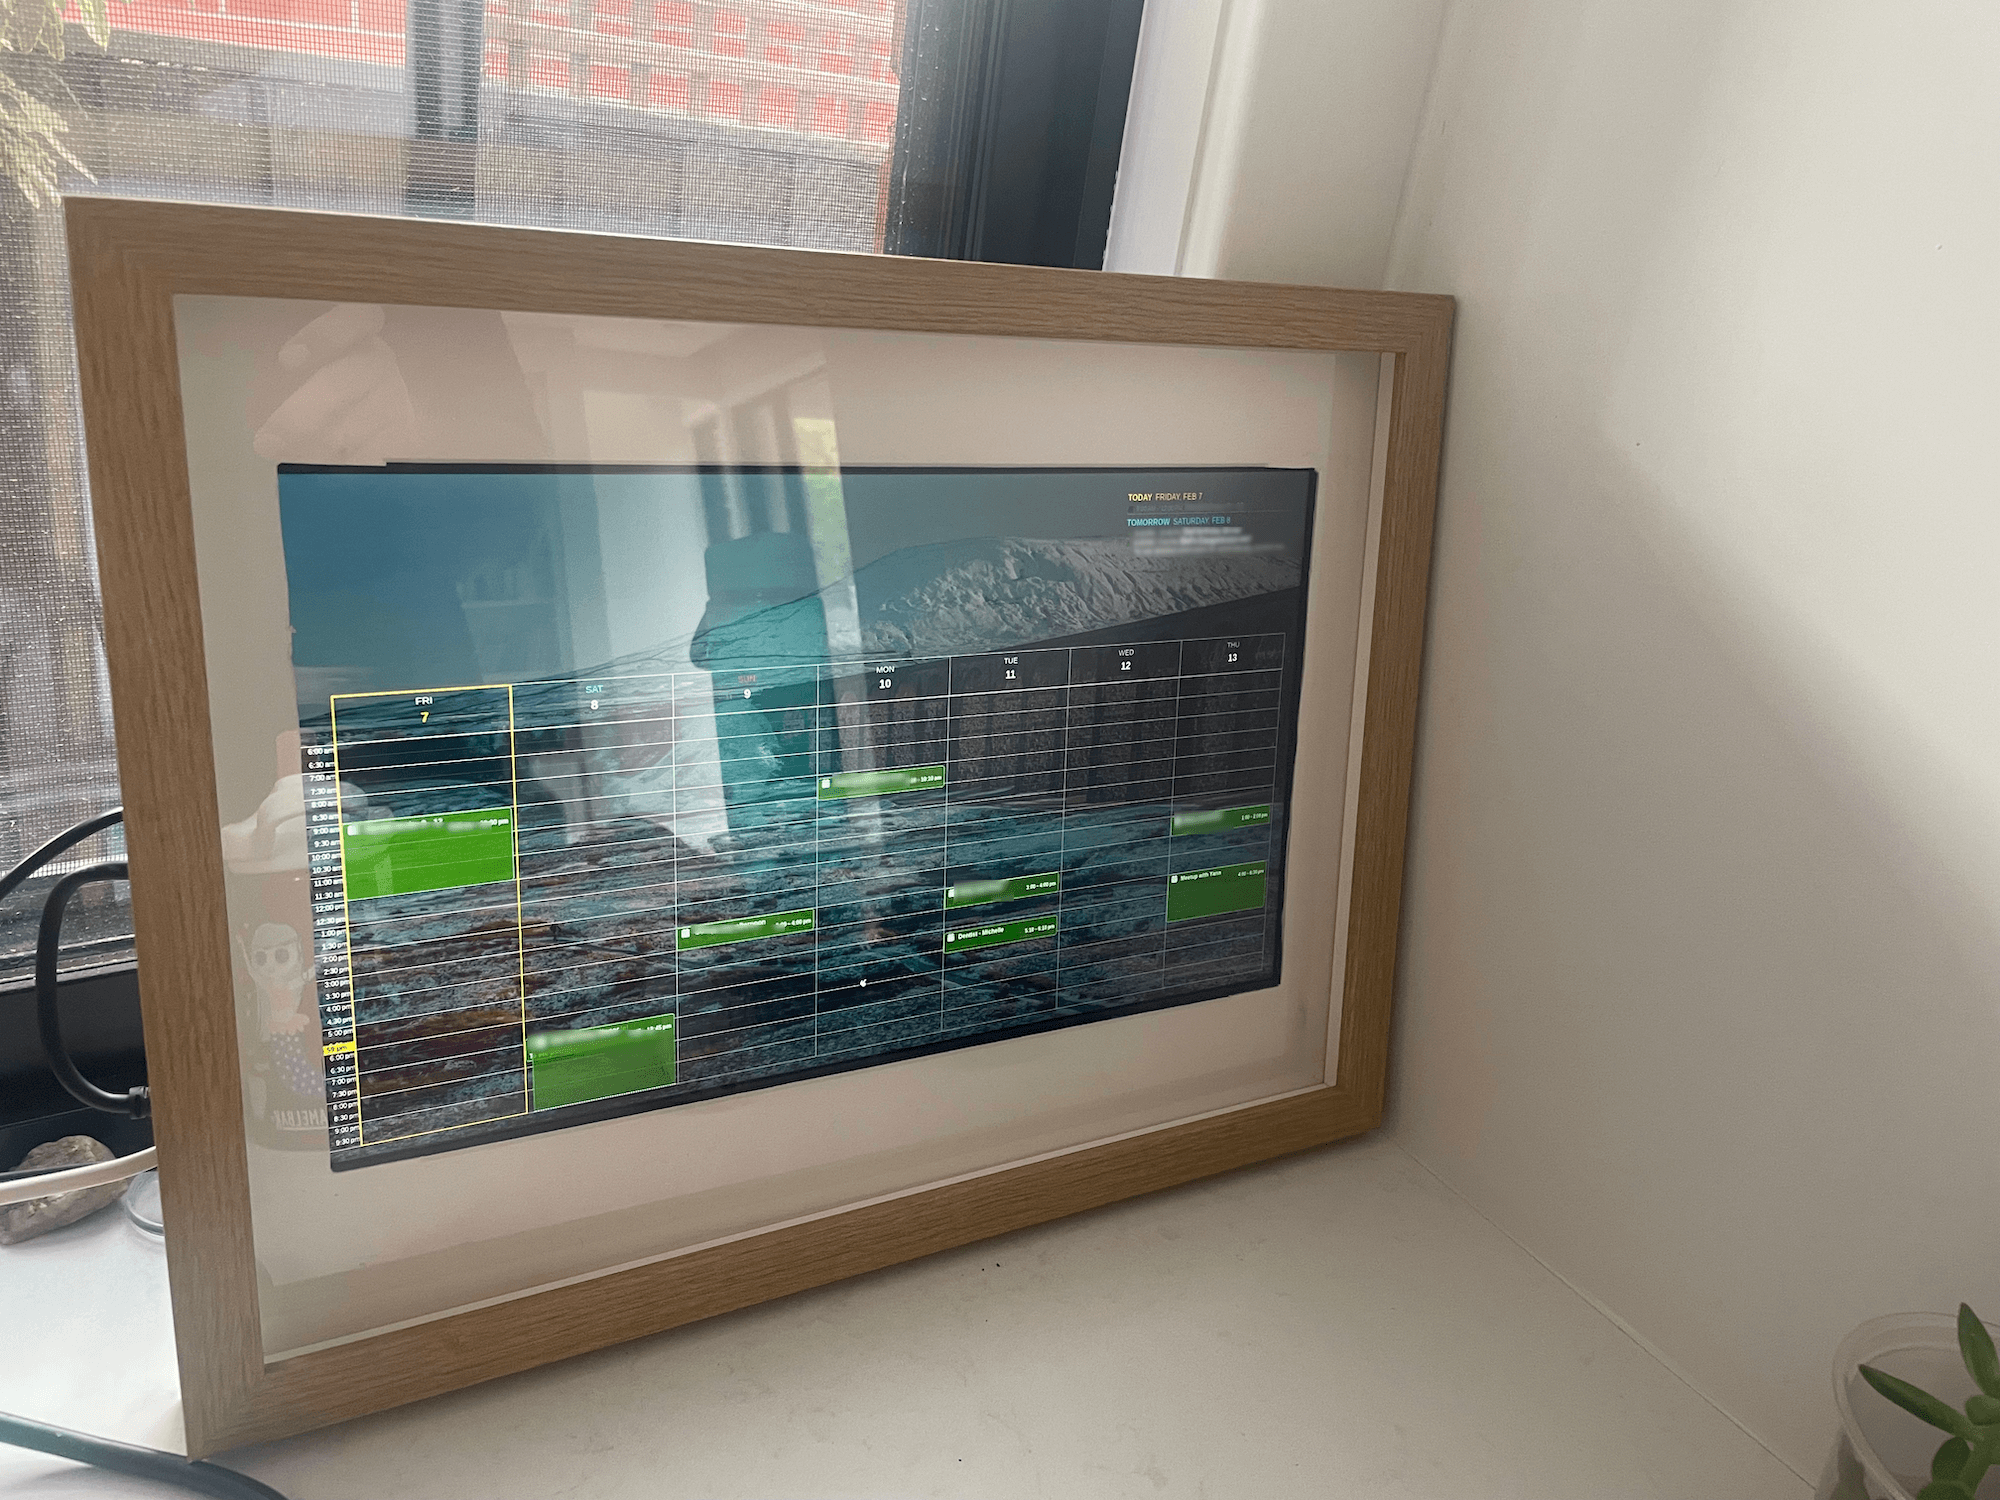
MVP Picture
I really ruined the matt board within the frame, hastily cutting it out with a pair of scissors. Also, the length of the cable adaptors didn’t align correctly by having the frame centred. I have picked up a separate matt board, which I’ll cut with a bit more precision at a later date. MVP baby.
MagicMirror in Ikea Frame
The Software
I’ve had my eye on MagicMirror for ages,
and although initially targeted at dashboards behind mirrors, it can be used for any kind of interactive display.
I deployed it in Docker to my home server (an upcycled old MacBook Pro with a smashed display).
MagicMirror does come with a bunch of included widgets, but the power is in the enormous ecosystem of plugins.
Coming from the HomeBridge ecosystem, I found MagicMirror a bit more effort to get going. Plugins are effectively git cloned into a mounted directory (i’m running it in Docker on another machine), and then most plugins will have
a NodeJS build step as well. Once the plugin is installed, you can then drop it in your config.json file, for it to appear on your dashboard. I ended up installing the following:
- MMM-CalendarExt3Journal: The hero piece of the dashboard. Provides a weekly calendar view of the main calendar.
- MMM-CalendarExt3Agenda: Provides a breakdown of events for the day. Handing to have a list of tasks in a consumable format.
- MMM-Wallpaper: For cycling through a selection of images. This plugin has a variety of different image sourcing options, but I ended up just pointing it to a local directory.
- MMM-Remote-Control: A plugin for remotely refreshing the dashboard. Perfect for the remotely managed raspberry pi.
- MMM-auto-refresh: A plugin for refreshing the display.
Once you’ve got your widgets all connected, you then need to style it. There doesn’t appear to be the concept of themes within the core framework. You’re effectively forced to break open your browsers dev tools, to work out the various CSS selectors to start styling your dashboard. It’s certainly super customisable, but it is limited to how familiar you are with CSS. This is not for the feint hearted.
What it looks like in the end. Don’t just my colour choices.
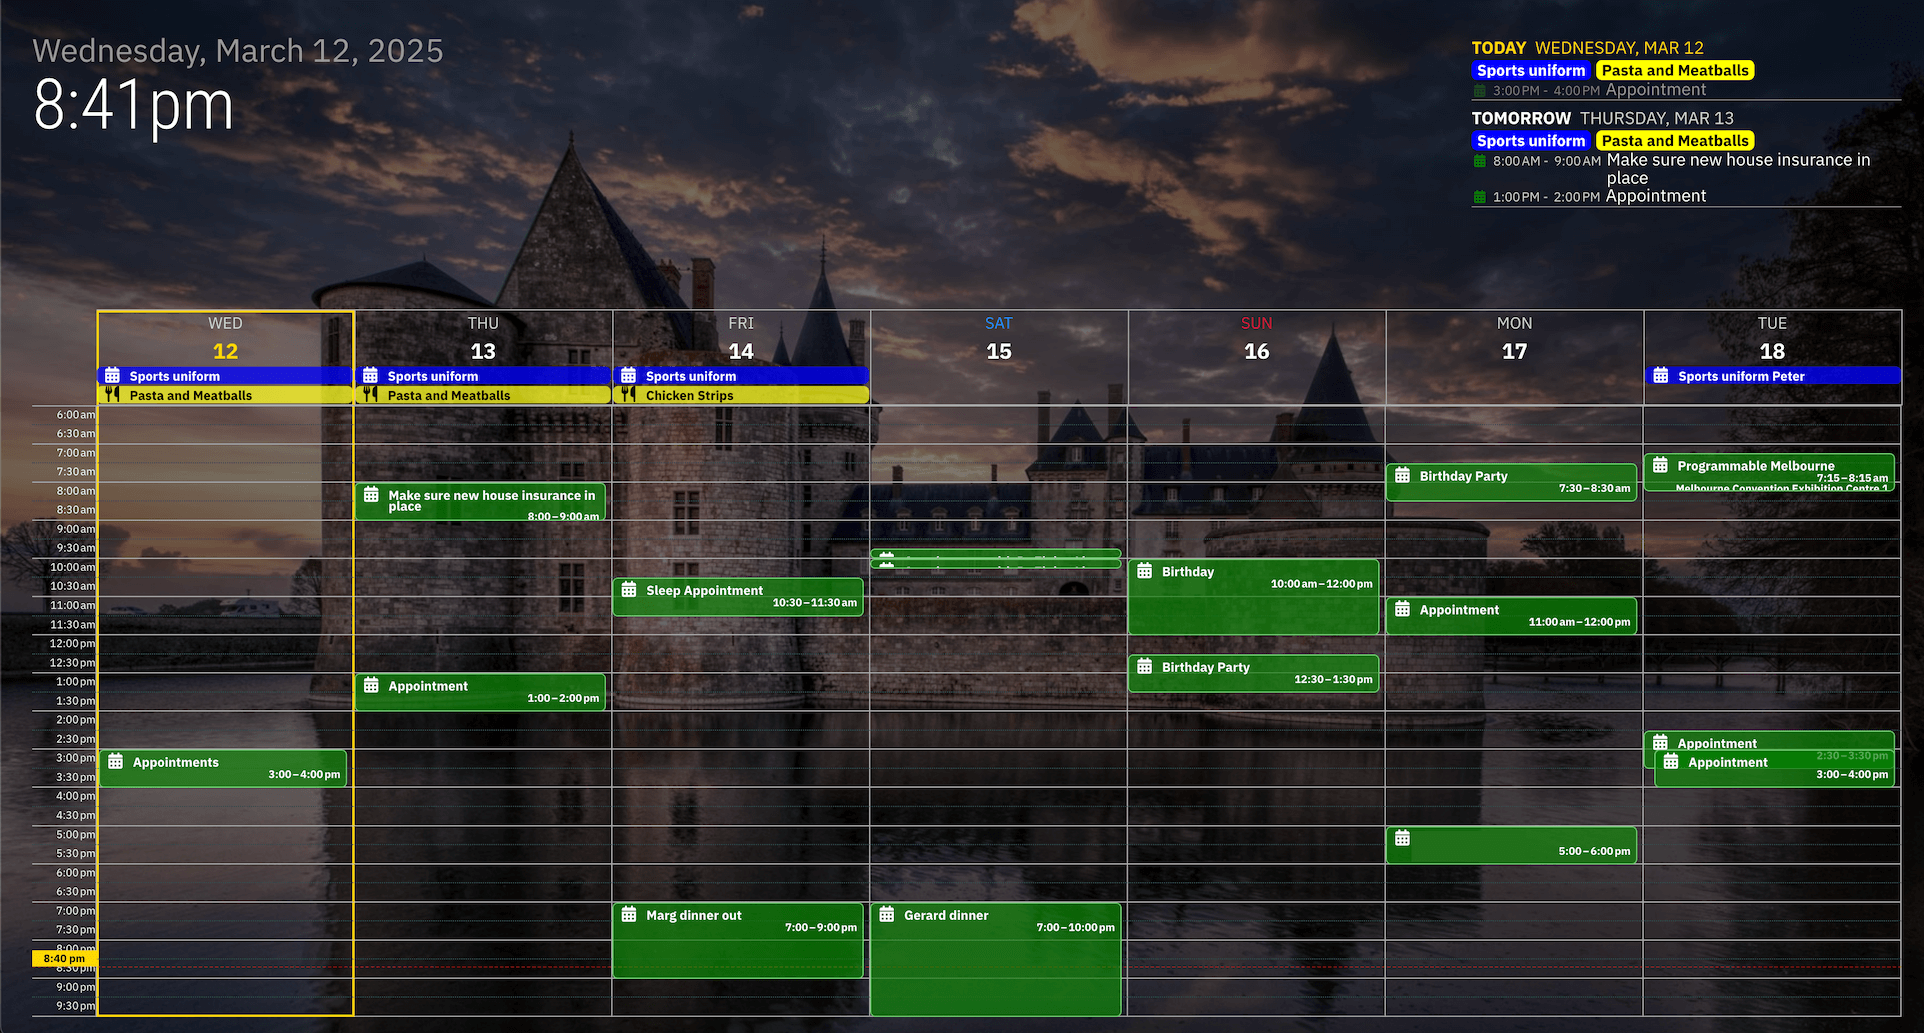
MagicMirror
Sanitised example of my configuration file:
let config = {
    address: "0.0.0.0",	// Address to listen on, can be:
    port: 8080,
    basePath: "/",
    ipWhitelist: [],	// Set [] to allow all IP addresses
    useHttps: false,			// Support HTTPS or not, default "false" will use HTTP
    httpsPrivateKey: "",	// HTTPS private key path, only require when useHttps is true
    httpsCertificate: "",	// HTTPS Certificate path, only require when useHttps is true

    language: "en",
    locale: "en-US",
    logLevel: ["INFO", "LOG", "WARN", "ERROR"], // Add "DEBUG" for even more logging
    timeFormat: 24,
    units: "metric",
    modules: [
        {
            module: 'MMM-auto-refresh',
            config: {
                refreshInterval: 1800000
            }
        },
        {
            module: "clock",
            position: "top_left", // This can be any of the regions.
            config: {
                timeFormat: "12",
                displaySeconds: false
            },
        },
        {
            module: "calendar",
            config: {
                calendars: [
                    {
                        broadcastPastEvents: true,
                        name: "family",
                        color: "green",
                        fetchInterval: 5 * 60 * 1000,
                        maximumEntries: 10000,
                        url: "https://calendar.google.com/calendar/ical/XXXX" // Shared Google Calender
                    },
                    {
                        broadcastPastEvents: true,
                        name: "uniforms",
                        color: "blue",
                        fetchInterval: 24 * 60 * 60 * 1000,
                        maximumEntries: 10000,
                        url: "https://calendar.google.com/calendar/ical/XXXXX" // School Uniform Calendar
                    },
                    {
                        broadcastPastEvents: true,
                        name: "food",
                        color: "yellow",
                        symbol: "utensils",
                        fetchInterval: 5 * 60 * 1000,
                        maximumEntries: 20,
                        url: "http://192.168.1.193:13000/calendar" // Meal Plan generated from Apple Note
                    },
                ]
            }
        },
        {
            module: "MMM-CalendarExt3Agenda",
            position: "top_right",
            config: {
                endDayIndex: 1,
                showMiniMonthCalendar: false
            }
        },
        {
            module: "MMM-CalendarExt3Journal",
            position: "bottom_bar",
            config: {
                height: '68vh', // Half of the screen
                hourLength: 16, // Display 12 hours
                beginHour: 6, // From 7 o'clock
                days: 7, // For 7 days,
                locale: "en-AU",
                calendarSet: ["family", "uniforms", "food"]
            }
        },
        {
            module: "MMM-Wallpaper",
            position: "fullscreen_below",
            config: {
                source: "local:/pictures",
                slideInterval: 10 * 60 * 1000 // Change slides every minute
            }
        },
        {
            module: 'MMM-Remote-Control',
            config: {
                customCommand: {},  // Optional, See "Using Custom Commands" below
                showModuleApiMenu: false, // Optional, Enable the Module Controls menu
                secureEndpoints: false, // Optional, See API/README.md
            }
        },
    ]
};

/*************** DO NOT EDIT THE LINE BELOW ***************/
if (typeof module !== "undefined") { module.exports = config; }
Meal Planning with Apple Notes
My wife’s other main requirements, was being able to show what the week’s meal plan situation looks like. I do a lot of the supermarket shopping and cooking, but it’s important to have visibility of what we’re having across the week. A meal plan is something that doesn’t naturally fit very well within a calendar, and is something I usually put together in Apple Notes. So, how do I get my Apple Notes based data onto my MagicMirror? I was initially fretting about having to write some kind of iOS based application, to interact with Notes.
After going down a rabbit hole, Notes doesn’t appear to be accessible via 3rd party apps. However, what you can integrate with is iOS’s Shortcuts. You can use it to run a small script after the application is minimised. What I’ve done, is effectively extract the contents of the Dinner note every time the application is closed (and I’m on my home network), and make a HTTP Post call to a specific endpoint. I’m amazed that this something Apple supports out of the box.
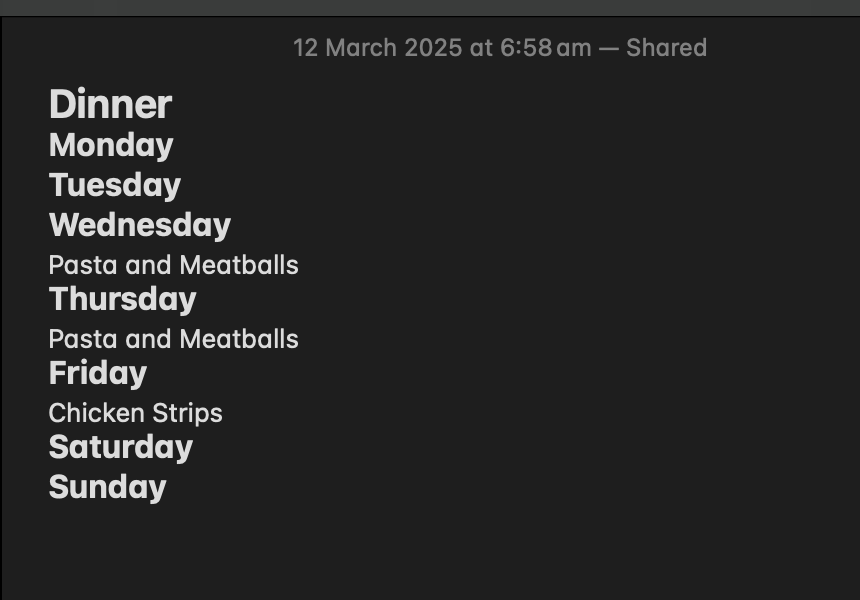
Dinner Selection Note
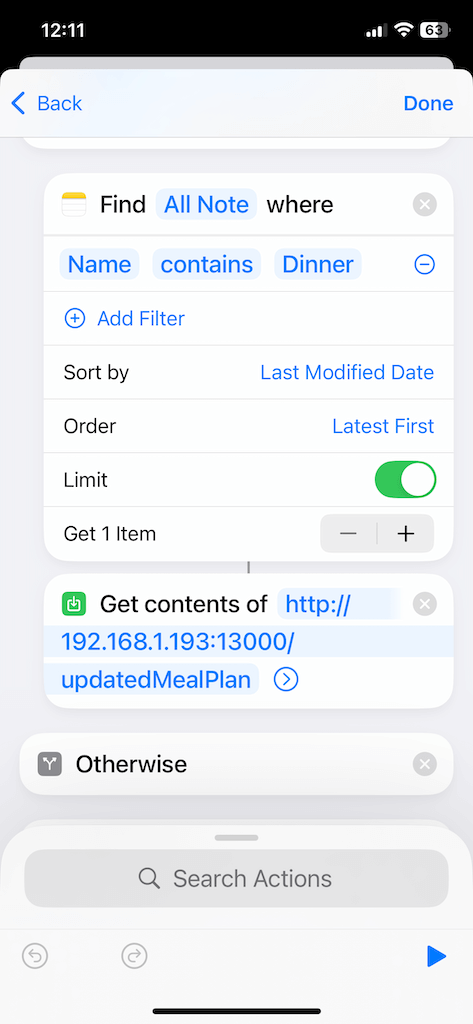
Shortcuts Example
Then, mainly using Github Copilot, I wrote a small application which parses the Monday-Sunday header separated Notes file, and then serves the data within the ICS Calendar format, so the standard Calendar module can parse the data. The results?
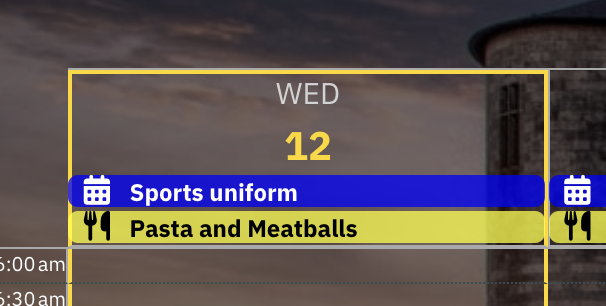
Meal Planning
Turning the Display On/Off
The power of home based automation comes when you can tie all your bits and bobs together. I’m running a Zigbee2MQTT with HomeBridge setup, for control predominately via Apple Homekit, with complex automations handled by NodeRed. I’ve got a couple of IR motion Zigbee sensors within the room (think Philips Hue Motion Sensor) which coupled with NodeRed, allow you to run automations based on motion. With the motion data available, I’m able to then power off the display when nobody is present within the room; saving power when nothing is actually looking at it.
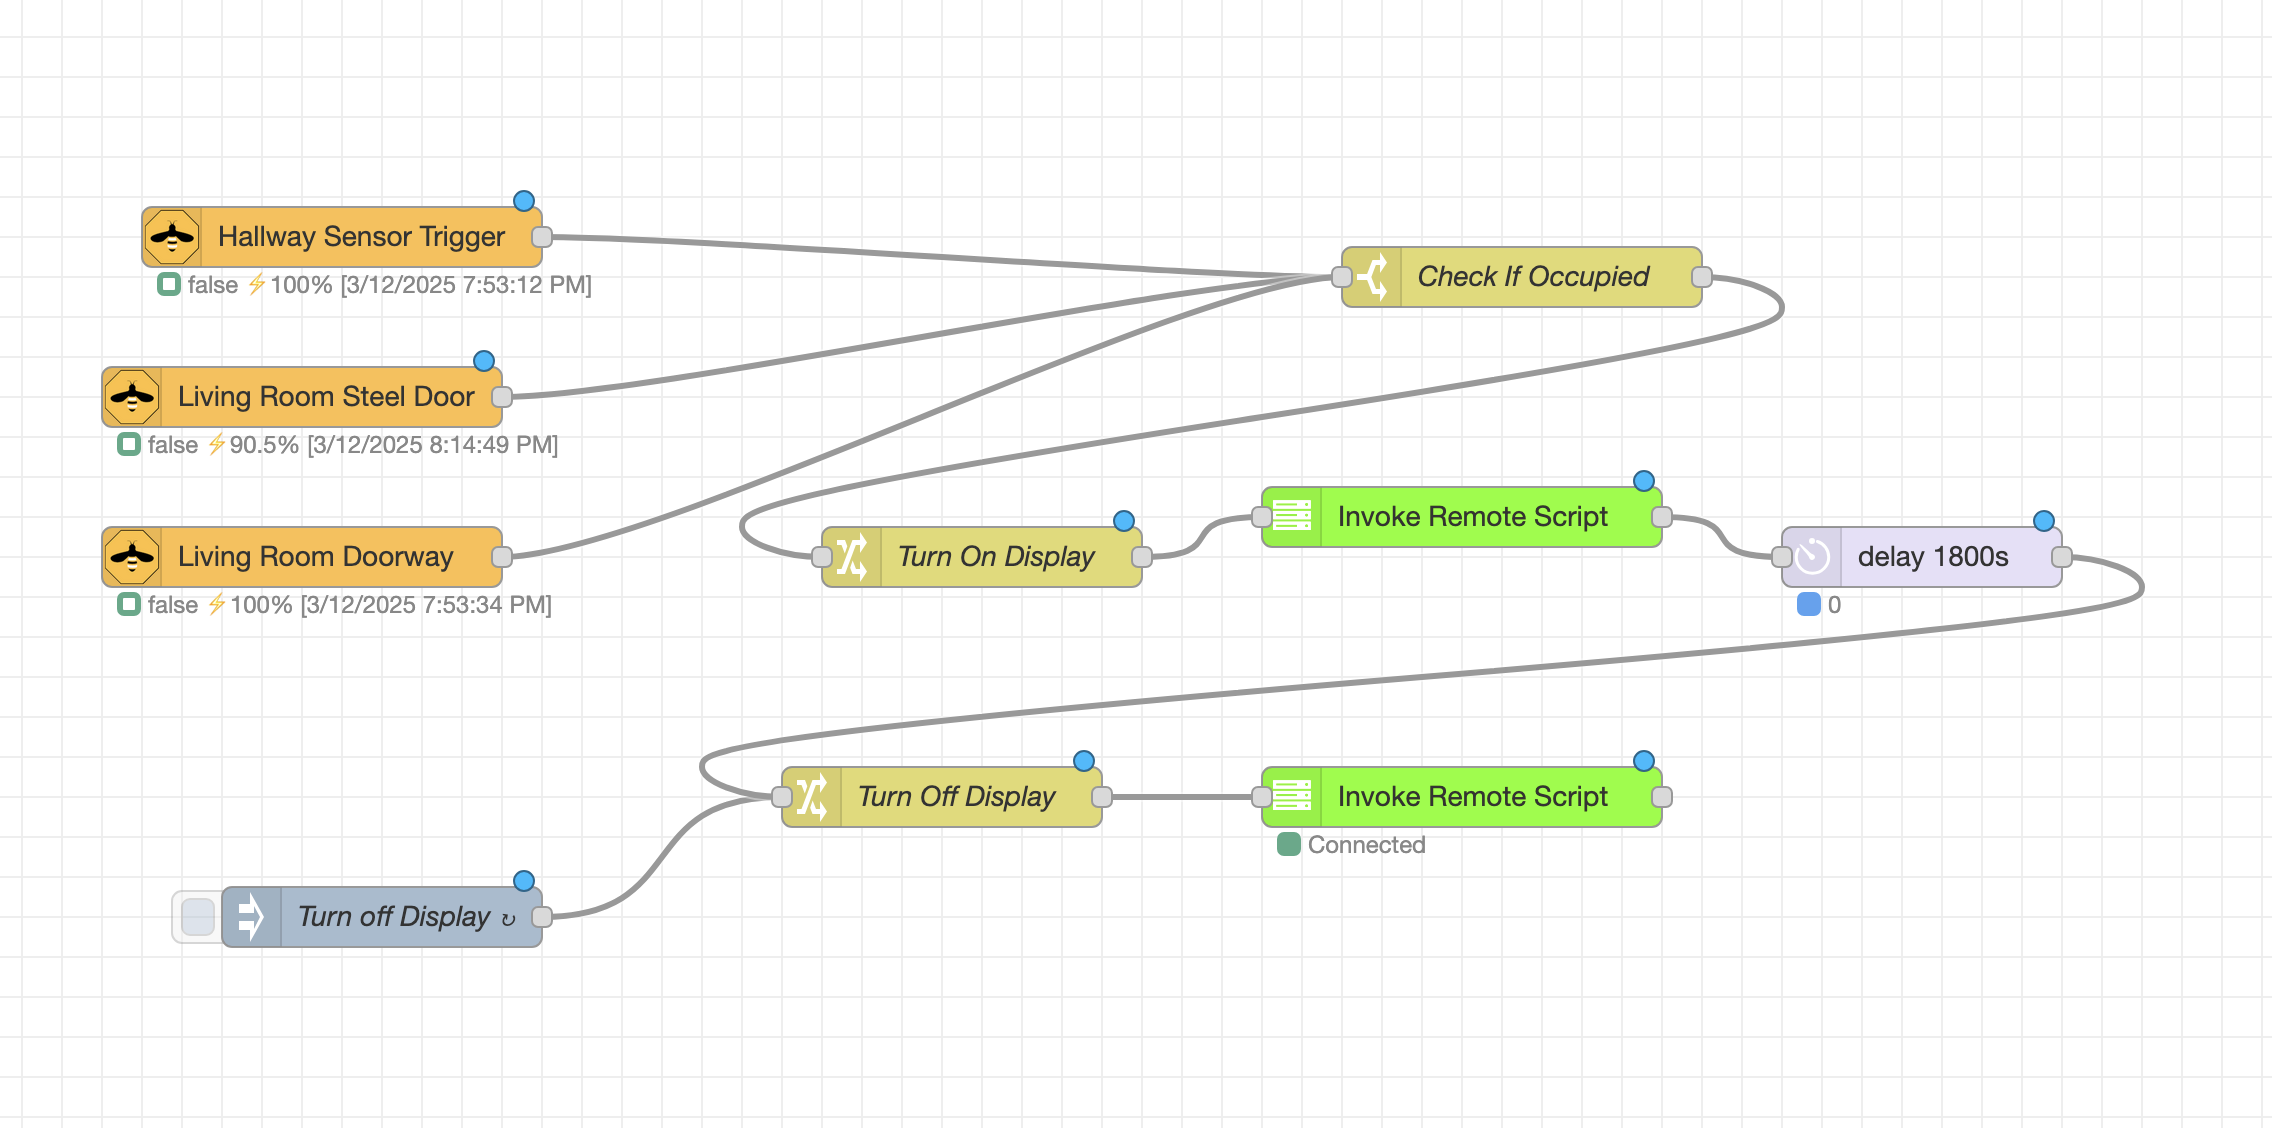
NodeRed Display Control
I’ve loaded a plugin into NodeRed to allow it to trigger shell scripts on the RaspberryPi, which then turn the display
on/off when called.
#!/bin/bash

if [ "$1" == "off" ]; then
  wlr-randr --output HDMI-A-1 --off
elif [ "$1" == "on" ]; then
  wlr-randr --output HDMI-A-1 --on --mode 1920x1080
else
  echo "Invalid argument. Use 'off' or 'on'."
  exit 1
fi
Fin
It’s been incredibly fun building something IoT based which is actually solving a problem for my family. So many moving parts, but I think the result is worth it in the end. I can’t wait to explore some additional plugins, to make the display even more useful. Onwards and upwards.